

Create your own AI chat with Gemini and Nebular
Use the Gemini API and Nebular UI to build your own AI conversational chat

Front-end software engineer and I specialise in Angular🤖. I've been working with it since Angular JS and I like to keep up with new technologies. I love to write about Angular, TypeScript, JavaScript and more 📰. My hobbies are travelling around Southeast Asia ✈️, cars and technology.
As you know I have been using the Gemini API for the last two months, I wrote an article about it but it was a simple application just to know how the Gemini API works.
This is the second part of the exploroing the Gemini API, you can take a look at the first part here.
In this article we take a deep dive into the Gemini API using the UI library Nebular for Angular, Nebular brings us a powerfull library with over 40+ components, I chose that specifically for the chat component.
The plan is to build a real time conversational chat application, the chat will be specialized in Angular and TypeScript to bring us the best answers.
How to get the API key?
Go to https://ai.google.dev/ and get your API key
Once we have the key we need to create a project to use it, in this case, we are going to use Angular.
Creating our Gemini project
First, we will create our project to be able to use Gemini, I assume you have everything you need to work with Angular installed, if not you can see it here:
https://angular.dev/tutorials/first-app
We will create our project using Angular CLI:
ng n gemini-chat
Installing and configuring Nebular
Once we have created the project, we need to install the Nebular UI library.
Here we have the documentation in case you get lost.
ng add @nebular/theme
Add the Nebular module to our main module:
@NgModule({
  imports: [
    NbThemeModule.forRoot(),
  ]
})
Include the Nebular styles in angular.json:
"styles": [
  "node_modules/@nebular/theme/styles/prebuilt/default.css",
],
Installing the Gemini library
Install the Google Gemini library using the following command:
npm i @google/generative-ai
Make sure everything goes well and check your package.json to see if the google/generative-ai is installed.
Implementing the Gemini SDK
First of all we need to implement the API, so let's generate the environments and introduce your API key:
ng g environments
Set it up:
export const environment = {
    gemini_key: "your-key"
};
Now create a service to consume the API:
ng g s services/gemini
We will use the Gemini SDK to create an instance of Google AI with the key and generate a model called 'gemini-pro'.
The intended use of the model is based on a prompt. This prompt tells Gemini how to answer our questions.
import { GoogleGenerativeAI } from '@google/generative-ai';
import { environment } from '../../environments/environment';

generativeAI = new GoogleGenerativeAI(environment.gemini_key);
model = this.generativeAI.getGenerativeModel({ model: 'gemini-pro' });
We select answers from Angular and TypeScript experts.
prompt = 'You are an Angular and TypeScript expert, answer the questions providing the best examples including code'
This is the main logic of our application and it's the way to connect with Gemini, we used a try catch to avoid errors, then we check if we have the text and start building our object for the Gemini SDK, we need to add to our model that we generated before the prompt and the question that we will get the response and in this case we just need to get the text object, we return that to use after in our component.
  async generate(textInput: string) {
    try {
      if (textInput) {
        const parts = [{text: this.prompt,},{ text: textInput }];

        const modelResult = await this.model.generateContent({
          contents: [{ role: 'user', parts }],
        });
        const response = modelResult.response;
        const text = response.text();
        return text;
      }
    } catch (e: any) {
      return 'An error has ocurred';
    }
    return 'Ann error has ocurred';
  }
Creating the chat interface with Nebular
Nebular is a customizable open source Angular UI library that contains over 40 UI components.
It has a chat component with everything you need to build a chat application, it's all done so we just need to specify the information.
We need to import all the Nebular modules that we will use, in this case the most important ones are NbChatModule and NbLayoutModule, also we add the NbCardModule and NbSpinnerModule to add the spinner animation while we wait for the API response.
import { NbCardModule, NbChatModule, NbLayoutModule, NbSpinnerModule, NbThemeModule } from '@nebular/theme';
import { provideAnimations } from '@angular/platform-browser/animations';

@NgModule({
    ...
  imports: [
    ...
    NbChatModule,
    NbLayoutModule,
    NbCardModule,
    NbSpinnerModule
  ],
  providers: [provideAnimations()],
})
Don't forget to add the provideAnimations() in the providers to add the smooth animations while we are chatting.
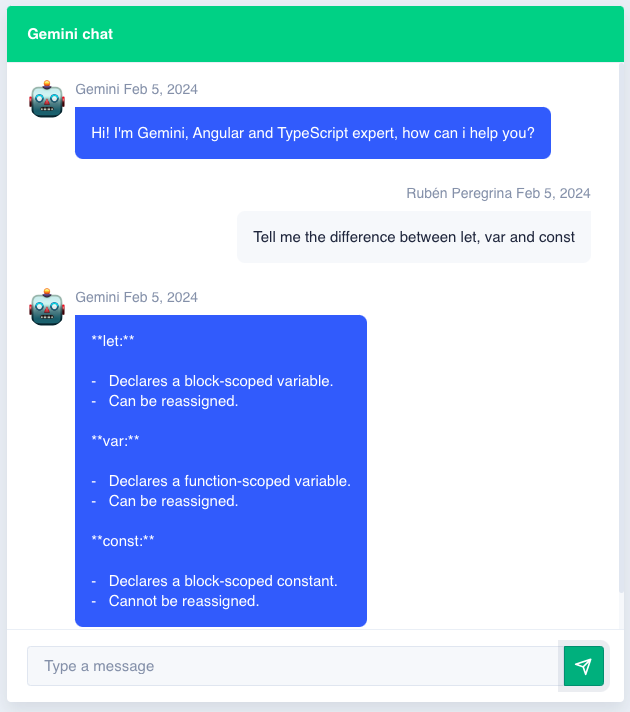
Let's start with the template, we will add an nb-card to have the spinner feature while we are chatting, the nb-chat to see the conversation and the nb-chat-form to have the input message:
<nb-layout>
  <nb-layout-column>
    <nb-card [nbSpinner]="isLoading" nbSpinnerMessage="Loading..." nbSpinnerSize="giant" nbSpinnerStatus="success">
    <nb-chat title="Gemini chat" [status]="'success'" size="large">
      @for( msg of messages; track msg.id){
        <nb-chat-message
        [type]="msg.type"
        [message]="msg.text"
        [reply]="msg.reply"
        [sender]="msg.user.name"
        [date]="msg.date"
        [avatar]="msg.user.avatar"
      >
    </nb-chat-message>
    }
    <nb-chat-form (send)="sendMessage($event)" [dropFiles]="true"> </nb-chat-form>
    </nb-chat>
    </nb-card>
  </nb-layout-column>
</nb-layout>
Let's add the logic to understand everything, we have to create the isLoading variable and the messages variable in this variable we will have our conversation, starting with the initial message.
  isLoading = false;
  messages: any[] = [
    {
      text: 'Hi! I\'m Gemini, Angular and TypeScript expert, how can i help you?',
      date: new Date(),
      reply: false,
      user: {
        name: 'Gemini',
        avatar: 'https://s3.amazonaws.com/pix.iemoji.com/images/emoji/apple/ios-12/256/robot-face.png',
      },
    },
  ];
Do not forget to add our Gemini service
import { GeminiService } from './services/gemini.service';
geminiService = inject(GeminiService);
Then, when the user asks a question we need to add their message to our messages array, call our gemini service and get the response, then add the new message to our array.
  async sendMessage(event: any) {
    this.isLoading = true;
    this.messages.push({
      text: event.message,
      date: new Date(),
      reply: true,
      type: 'text',
      user: {
        name: 'Rubén Peregrina',
        avatar: 'https://cdn-icons-png.flaticon.com/512/5556/5556468.png',
      },
    });

    const botReply = await this.geminiService.generate(event.message);

    this.messages.push(    {
      text: botReply,
      date: new Date(),
      reply: false,
      user: {
        name: 'Gemini',
        avatar: 'https://s3.amazonaws.com/pix.iemoji.com/images/emoji/apple/ios-12/256/robot-face.png',
      },
    },
    );
    this.isLoading = false;
  }
The Nebular chat need this structure to work, the text is the message, the date is the date that will be displayed in our message, reply it's to know who is texting and finally the user, we can add the name and the avatar to display.
Conclusion
Finally we have our fully functional chat working with Nebular and the Gemini SDK, in this case we add a prompt to get expert answers about Angular and TypeScript.
This is the second part of the exploring the Gemini API, you can take a look at the first part here.


